> ## Documentation Index
> Fetch the complete documentation index at: https://docs.scripe.io/llms.txt
> Use this file to discover all available pages before exploring further.
# DWY Offer Set-Up: Working in a Client’s Workspace in Scripe
A **DWY (Done-With-You) offer** is a service model where you and the client **work together** to build or execute something, instead of you doing it all for them (DFY: Done-For-You) or just teaching them (DIY: Do-It-Yourself).
In this scenario, the **client is paying for Scripe (instead of you),** and you both collaborate on their workspace.
Here's how to collaborate in Scripe on a DWY offer:
## DWY Scripe Set-Up
Before working with a client, we recommend that you:
1. **Get familiar with Scripe** – follow this [step-by-step guide](/started/easy-set-up) to set up **your own workspace first** and learn the platform inside out.
2. [Join our Workshops](https://lu.ma/scripe?k=c) – bring questions, learn best practices, and get support.
As part of our Business Plan, you can book a 1:1 onboarding directly from your dashboard to support your Scripe set-up.
### 1. What to send to your Client for Set-Up
Copy and paste the following checklist and send it to your client (make sure to add your partner link and emails where prompted).
**Scripe Set-Up Checklist:**
✅ Sign up to Scripe using the following link: `partner link`.
✅ Name your workspace and go through the product onboarding.
✅ Create a **Business Plan** account.
✅ **Connect your LinkedIn account** during the onboarding.
✅ Go to **Settings → Users & Accounts**
✅ Invite the following emails as a second Admin to the Workspace: `list the email(s).`
👉 Optional: Invite further members to the workspace.
👉 Optional: Read this [Setup Guide](/started/easy-set-up) for assistance.
### **Important reminders:**
* Ensure your clients set up an **Advanced or Business account** so you can collaborate within Scripe.
* To get rewarded and earn commission, make sure your clients sign up via **your partner link**.
* If you’re not yet in the program, sign up for the [Partner Program here](https://scripe.io/partners).
### 2. How to access your Client's Workspace
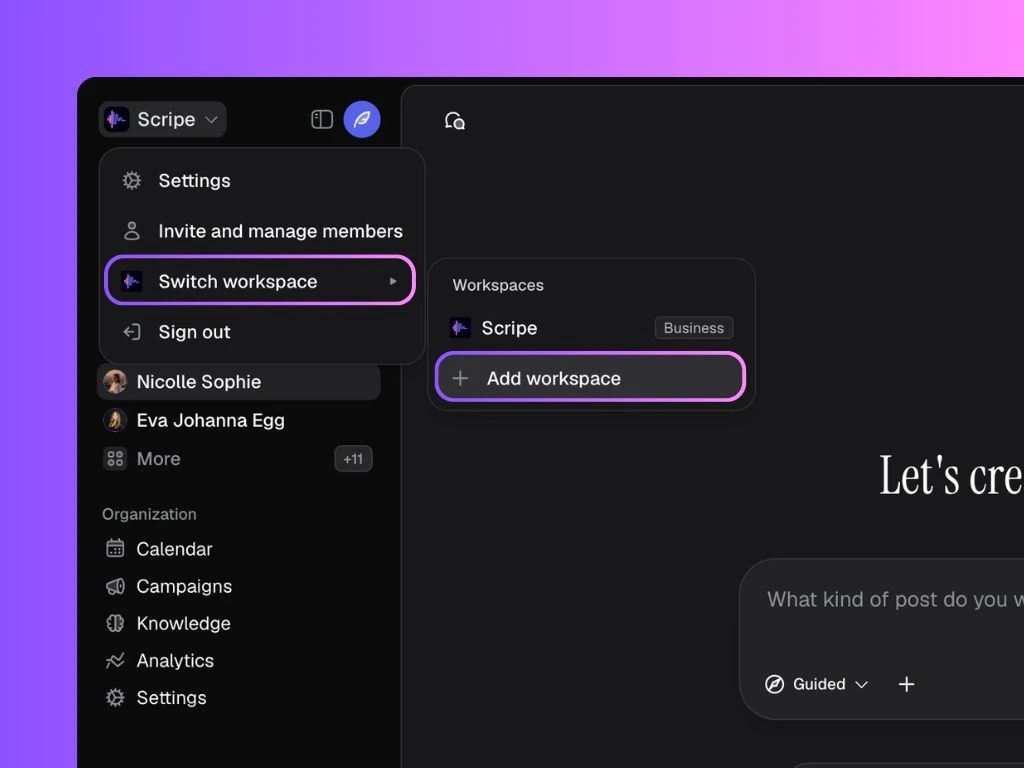
1. Once invited, you’ll see their workspace listed under **Switch Workspace** in your account.
2. Click their workspace name to access it and collaborate.
This is also how you switch between different clients' workspaces in case you work with multiple clients within Scripe.
 ### 3. Meet in your Scripe Introduction Call
Complete the Scripe Setup with your client and introduce them to all relevant workflows.
**Checklist for your Scripe Intro Calls with Clients:**
Scripe works best when it truly understands you. The more context Scripe has about your business, goals, and voice, the better the content, ideas, and recommendations it generates.
The first two things we're setting up together are Tone of Voice and Content Strategy.
Then you should upload as many inputs as possible to the Knowledge Base, and make a habit out of it.
The Knowledge Base is Scripe’s **long-term memory**.
It’s where you store everything Scripe should always know about you, your business, and your expertise — so you don’t have to explain it again every time you create content.
The Knowledge Base works best when it includes relevant materials, such as:
* Sales decks or one-pagers
* Case studies or success stories
* Website copy, landing pages, or blog posts
* ICP or persona descriptions
* Recorded calls, webinars, or podcasts
Want to give even more value to your client? Use our ICP Questionnaire template to define their ICP, fill it out together, and then upload it to the Knowledge Base.
**Get your template in:**
* [German](https://docs.google.com/document/d/1_INzccuwM-ebcP2KZmEBJ1NMomHSYqCIpaqKzhyPReQ/edit?usp=sharing)
* [English](https://docs.google.com/document/d/1oh4FvXvWrliZ6UmRiF05fwadGEp7-Jkg-_e_82S7H6Q/edit?usp=sharing)
**Best practices to fill it out:**
* Avoid generic answers (“we target tech companies”). Get really specific.
* Use the client’s own language — how do they describe their challenges?
Once all of the above is done, Scripe will begin generating [weekly AI-powered Content Suggestions](https://scripe.mintlify.app/multiple-posts/ai-powered) (done-for-you post ideas). You’ll revisit these suggestions together later in the call to review and refine them.
Now let's walk the client through the post-generation, management, and scheduling:
Start with one of the Chat Modes in Scripe. For example, pick the Guided Mode and select the next suggested Content Pillar.
Once a draft is generated, move into the Scripe Editor:
* Show the client they can directly edit the text.
* Show they can keep using the chat in the editor to refine the post until it feels right.
From the Editor, explain the publishing options:
* **Schedule post to LinkedIn** → set the post for automatic publishing.
* **Save as draft in the calendar** → add the post to the calendar as a draft.
* **Publish immediately** → push it live on LinkedIn right away.
Guide the client to schedule their first Scripe-generated post, then show them the post in the Calendar view.
Let the client know that the LinkedIn connection may occasionally expire. Scripe will flag this on the dashboard and prompt them to reconnect when needed.
Back to the dashboard, guide your client to connect their [WhatsApp](/integrations/whats-app) to instantly send ideas or content snippets straight into Scripe whenever inspiration strikes.
To install the WhatsApp integration, you can guide your client like this:
1. In your dashboard, top right corner, click on the WhatsApp symbol Connect.
2. A QR code will be displayed.
3. Open WhatsApp on your phone, scan the QR code, and you’re connected.
4. Send an audio or a text message to see it in action.
5. Go to Sources to see the input in there, click on it.
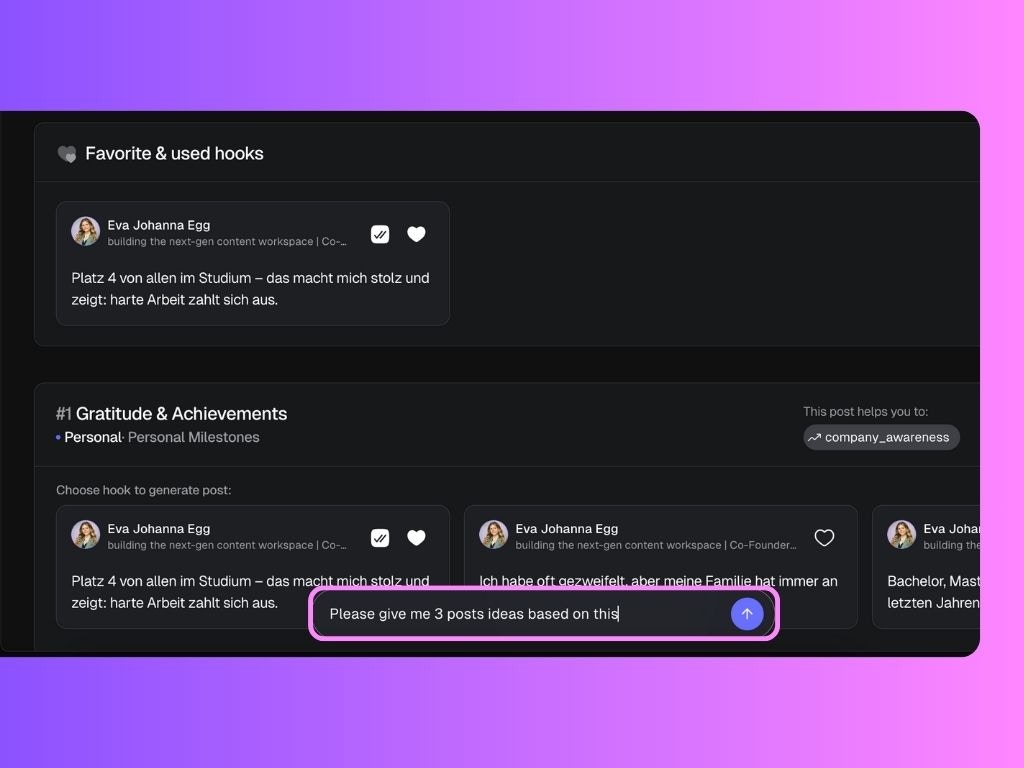
6. Use the bar at the bottom and ask it to give you post ideas based on it.
They can use this bar to prompt or ask anything, for all types of sources.
### 3. Meet in your Scripe Introduction Call
Complete the Scripe Setup with your client and introduce them to all relevant workflows.
**Checklist for your Scripe Intro Calls with Clients:**
Scripe works best when it truly understands you. The more context Scripe has about your business, goals, and voice, the better the content, ideas, and recommendations it generates.
The first two things we're setting up together are Tone of Voice and Content Strategy.
Then you should upload as many inputs as possible to the Knowledge Base, and make a habit out of it.
The Knowledge Base is Scripe’s **long-term memory**.
It’s where you store everything Scripe should always know about you, your business, and your expertise — so you don’t have to explain it again every time you create content.
The Knowledge Base works best when it includes relevant materials, such as:
* Sales decks or one-pagers
* Case studies or success stories
* Website copy, landing pages, or blog posts
* ICP or persona descriptions
* Recorded calls, webinars, or podcasts
Want to give even more value to your client? Use our ICP Questionnaire template to define their ICP, fill it out together, and then upload it to the Knowledge Base.
**Get your template in:**
* [German](https://docs.google.com/document/d/1_INzccuwM-ebcP2KZmEBJ1NMomHSYqCIpaqKzhyPReQ/edit?usp=sharing)
* [English](https://docs.google.com/document/d/1oh4FvXvWrliZ6UmRiF05fwadGEp7-Jkg-_e_82S7H6Q/edit?usp=sharing)
**Best practices to fill it out:**
* Avoid generic answers (“we target tech companies”). Get really specific.
* Use the client’s own language — how do they describe their challenges?
Once all of the above is done, Scripe will begin generating [weekly AI-powered Content Suggestions](https://scripe.mintlify.app/multiple-posts/ai-powered) (done-for-you post ideas). You’ll revisit these suggestions together later in the call to review and refine them.
Now let's walk the client through the post-generation, management, and scheduling:
Start with one of the Chat Modes in Scripe. For example, pick the Guided Mode and select the next suggested Content Pillar.
Once a draft is generated, move into the Scripe Editor:
* Show the client they can directly edit the text.
* Show they can keep using the chat in the editor to refine the post until it feels right.
From the Editor, explain the publishing options:
* **Schedule post to LinkedIn** → set the post for automatic publishing.
* **Save as draft in the calendar** → add the post to the calendar as a draft.
* **Publish immediately** → push it live on LinkedIn right away.
Guide the client to schedule their first Scripe-generated post, then show them the post in the Calendar view.
Let the client know that the LinkedIn connection may occasionally expire. Scripe will flag this on the dashboard and prompt them to reconnect when needed.
Back to the dashboard, guide your client to connect their [WhatsApp](/integrations/whats-app) to instantly send ideas or content snippets straight into Scripe whenever inspiration strikes.
To install the WhatsApp integration, you can guide your client like this:
1. In your dashboard, top right corner, click on the WhatsApp symbol Connect.
2. A QR code will be displayed.
3. Open WhatsApp on your phone, scan the QR code, and you’re connected.
4. Send an audio or a text message to see it in action.
5. Go to Sources to see the input in there, click on it.
6. Use the bar at the bottom and ask it to give you post ideas based on it.
They can use this bar to prompt or ask anything, for all types of sources.
 The **Posts page** is where all content created in Scripe lives.
Explain to the client that this page gives them a **clear overview and control** over everything they’ve worked on: past, present, and upcoming.
On this page, they can:
* See all generated posts and drafts in one place
* Drag and drop posts between statuses (e.g. idea, draft, review, scheduled, published)
* Put a post under review and assign a reviewer
* Open any post to edit, refine, or repurpose it
* Schedule posts directly from this page
Use this to show how easy it is to move content through a real workflow without losing track of anything.
If your client has a specific workflow (for example: two review stages before a post goes live), you can set this up in the [Workspace Settings](/settings/post-status). Once configured, those custom statuses will appear on the Posts page and can be used via drag and drop like any other status.
The [Weekly post ideas](/post/ai-powered) might take a couple of hours to generate.
Before ending the call, check in the dashboard, below the chat, if there are any suggestions ready to be shown to your client. Let them know that these suggestions are based on their content strategy, posting goals, and personal tone and are generated weekly.
We recommend that, as a next step, you ask the client to create and plan 2-3 posts and assign them to you for review.
If you have time during the session, you can also introduce the Inspiration and Analytics pages to round out the session.
The **Posts page** is where all content created in Scripe lives.
Explain to the client that this page gives them a **clear overview and control** over everything they’ve worked on: past, present, and upcoming.
On this page, they can:
* See all generated posts and drafts in one place
* Drag and drop posts between statuses (e.g. idea, draft, review, scheduled, published)
* Put a post under review and assign a reviewer
* Open any post to edit, refine, or repurpose it
* Schedule posts directly from this page
Use this to show how easy it is to move content through a real workflow without losing track of anything.
If your client has a specific workflow (for example: two review stages before a post goes live), you can set this up in the [Workspace Settings](/settings/post-status). Once configured, those custom statuses will appear on the Posts page and can be used via drag and drop like any other status.
The [Weekly post ideas](/post/ai-powered) might take a couple of hours to generate.
Before ending the call, check in the dashboard, below the chat, if there are any suggestions ready to be shown to your client. Let them know that these suggestions are based on their content strategy, posting goals, and personal tone and are generated weekly.
We recommend that, as a next step, you ask the client to create and plan 2-3 posts and assign them to you for review.
If you have time during the session, you can also introduce the Inspiration and Analytics pages to round out the session.