> ## Documentation Index
> Fetch the complete documentation index at: https://docs.scripe.io/llms.txt
> Use this file to discover all available pages before exploring further.
# Scripe Easy Set-Up Guide
You can create your Scripe account either by clicking **Continue with Google** or **Continue with LinkedIn** to sign up instantly with those accounts, or by email, entering the **verification code** sent to your email in the field provided.
## 1. Name your Workspace
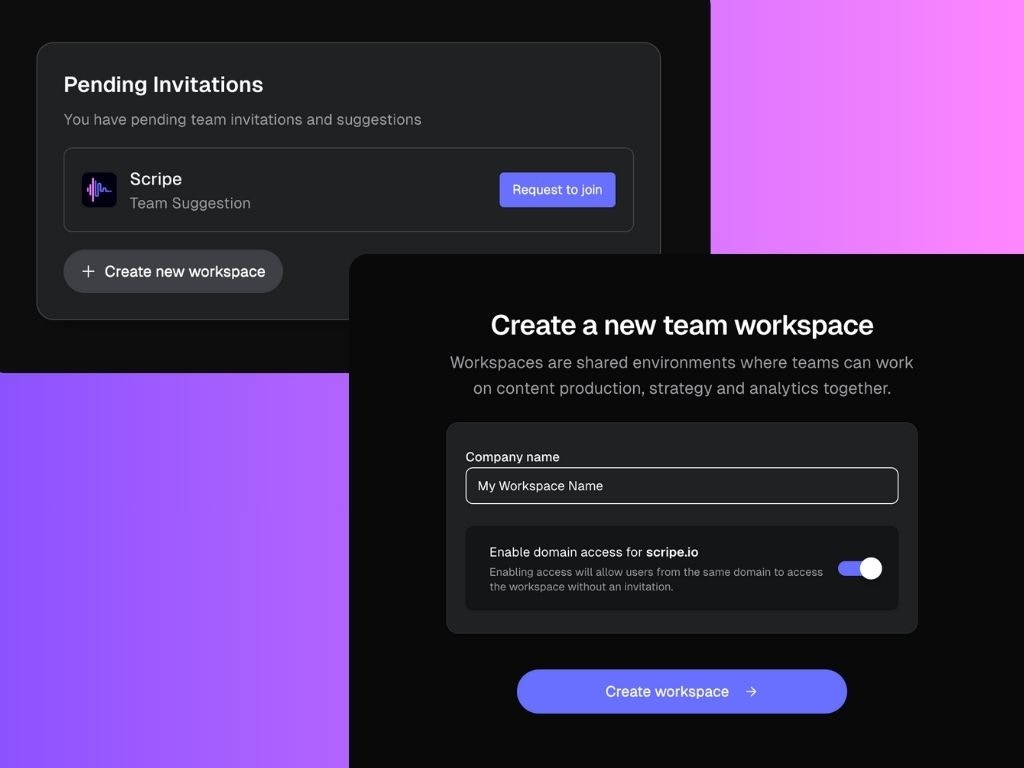
After creating your account, you’ll see any **pending team invitations** or suggestions.
Here, you can either click **Request to join** to accept an existing team invitation or choose **Create new workspace** if you want to start your account from scratch.
To create a new workspace, simply enter your **company name** in the field provided and decide whether to enable **domain access**, which lets anyone with the same email domain join the workspace automatically without needing an invitation (their access will still require approval from the workspace admin).
Once ready, click **Create workspace** to set it up.
If you’re on the **Business Plan**, you’ll have the flexibility to create and manage multiple workspaces within the product.
Right after creating your workspace, you’ll go through a quick onboarding flow where you’ll **connect your LinkedIn account.** Just follow the instructions on the screen, and you’ll be set up in a few clicks.
Scripe is currently one of the only LinkedIn content platforms that is an **Official LinkedIn API Partner** — meaning your account connection is handled through LinkedIn’s official infrastructure, making it significantly more stable, secure, and future-proof than browser-extension-based tools.
## 2. Select Your Plan
Before starting your trial, choose the right plan for your needs.
If you were added to a workspace, you can skip to Step #3 on this page ;)
Here’s what to know before selecting your plan and starting your **7-day free trial**:
* **LinkedIn account:** the number of personal LinkedIn profiles you can connect to Scripe.
* **User:** the person who logs into Scripe with their own credentials.
* **Workspace:** the main environment where your LinkedIn profiles are organized.
If you’re on the **Business Plan**, you’ll have the flexibility to create and manage multiple workspaces within the product.
You can choose between monthly or yearly billing (yearly saves you 20%).
**Quick heads-up:** switching plans during your trial triggers an immediate charge. If you’re simply looking to try a different plan, the best option is to create a new account and start a new trial on that plan.
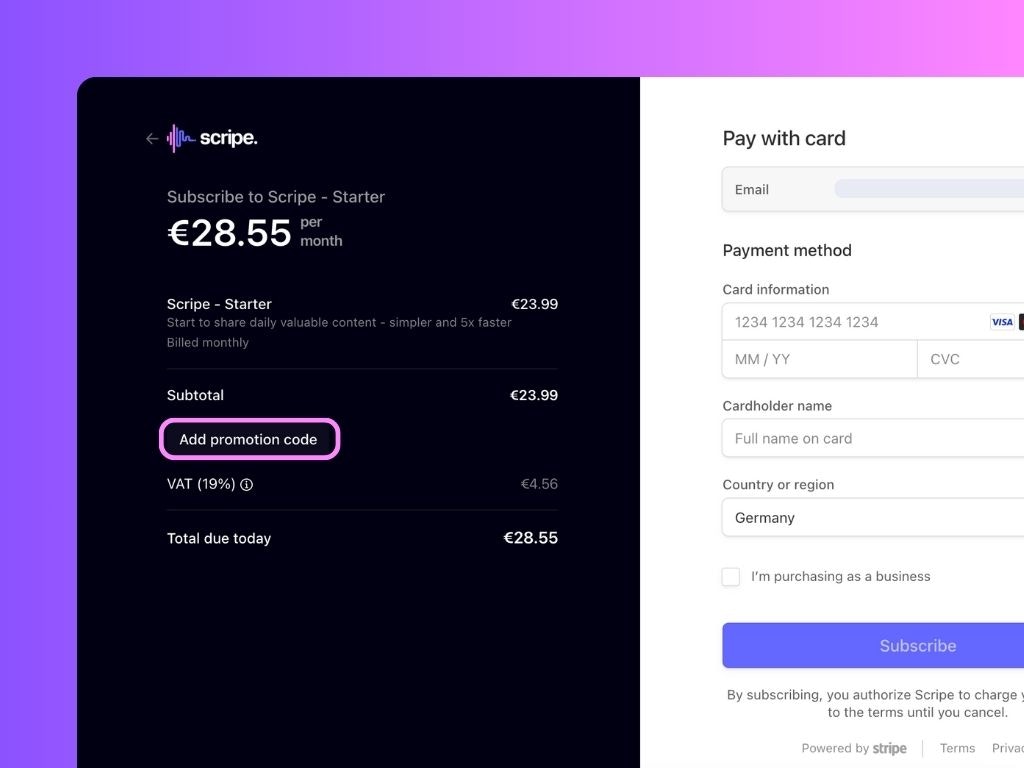
If you’ve received a coupon code from a friend or one of our partners, this is the moment to use it. Before paying, enter your code by clicking on **Add promotion code**.
Promo codes will only apply after your trial ends and your card is charged.
## 3. Set up your Scripe Workspace
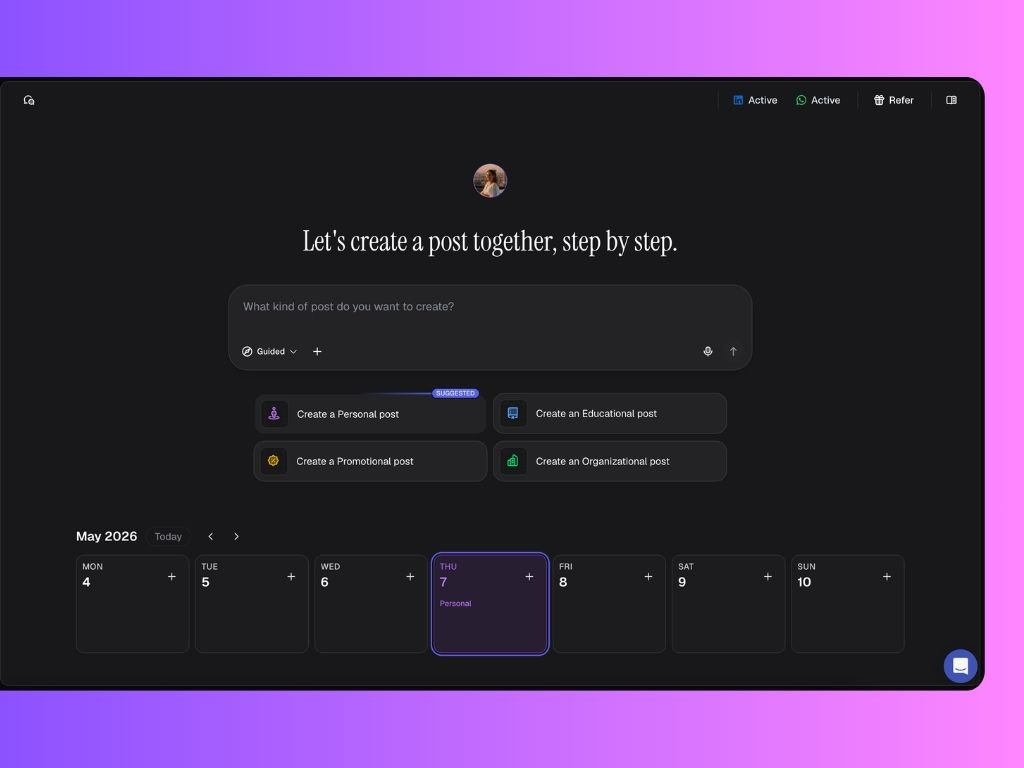
Once all of the above is done, you’ll land inside your **personal brand dashboard.**
But before you start scriping, make sure you complete these final setup steps:
Open your Knowledge Base from the left sidebar and click `+ New Content Source` on the Overview page.
**Add at least two items to complete your basic setup**.
Read more about what to upload to the Knowledge Base [here →](https://docs.scripe.io/knowledge/content-sources)
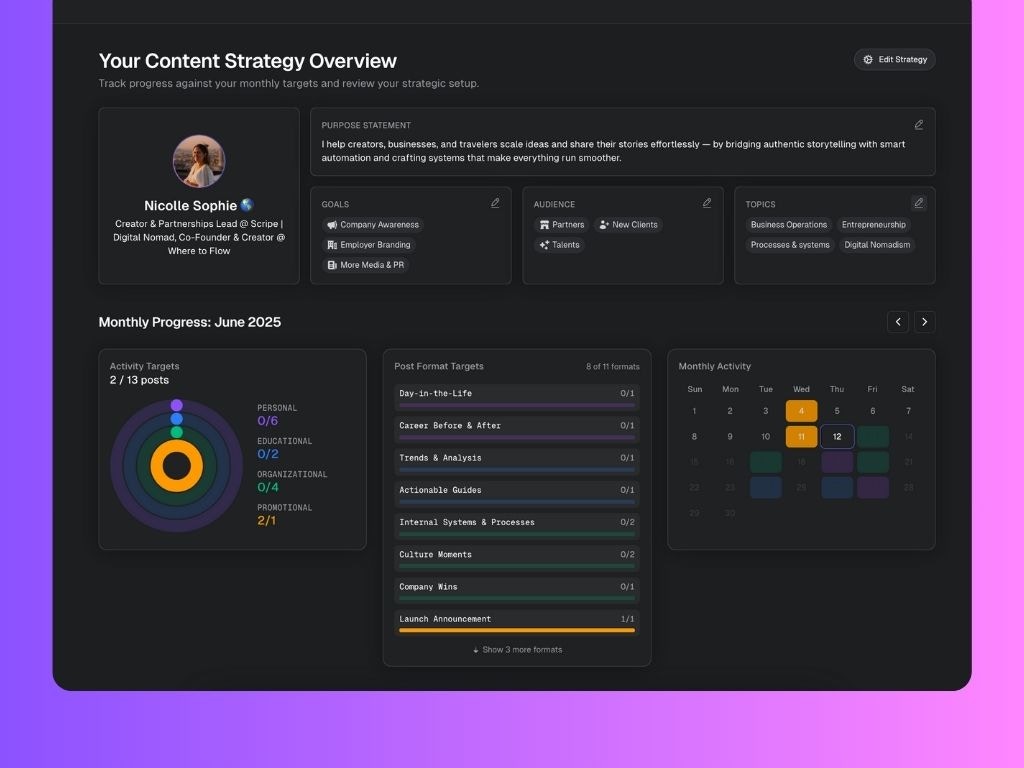
Open Content Strategy from the left sidebar and click `Create Content Strategy`.
You’ll go through a short setup process before Scripe generates a personalized strategy tailored to your goals, positioning, and audience.
Your Content Strategy defines the ideal mix of content pillars to focus on throughout the month to help you grow consistently on LinkedIn.
That’s also why you’ll see the 4 content pillars on your Personal Brand dashboard. Scripe will always suggest the pillar you should focus on next, based on your current content distribution.
Once all of the above is complete, Scripe will also generate [weekly post suggestions](https://scripe.mintlify.app/multiple-posts/ai-powered) (Advanced & Business plans only) aligned with your voice and strategy. \
\
And the best part: the more you use Scripe, the better these suggestions become as it learns how you think, write, and communicate ;)
## 4. Generating Posts with Scripe
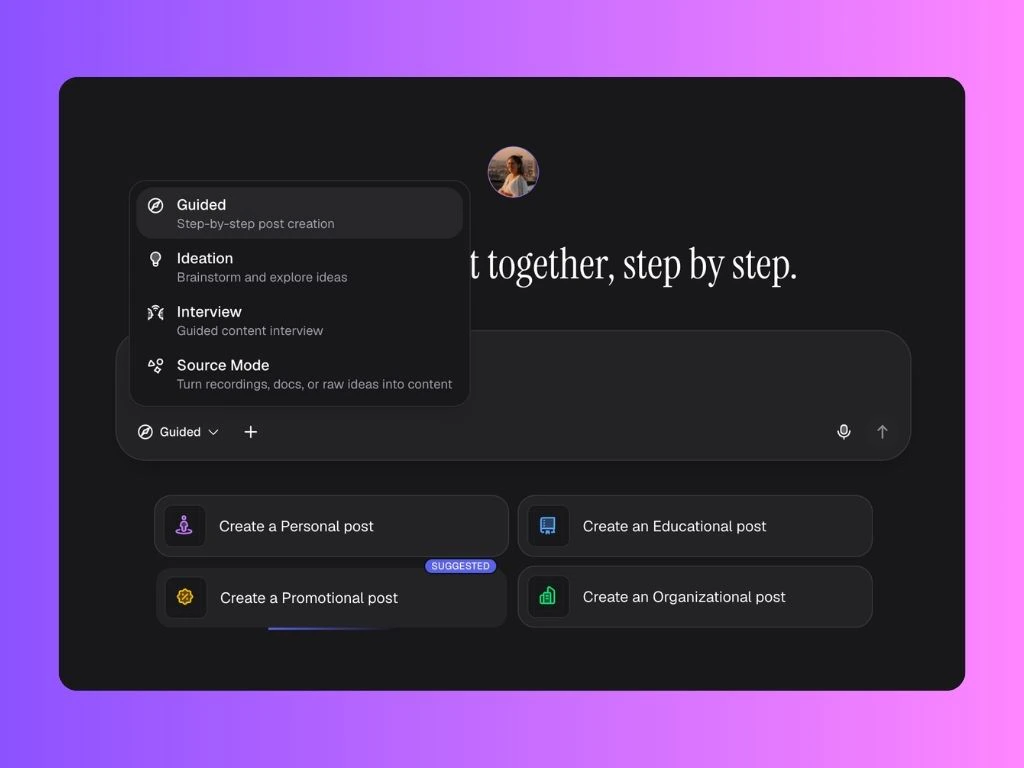
From your dashboard, you generate posts by:
* Using one of the Chat Modes:
* Guided → for step-by-step content creation
* Ideation → to explore and brainstorm new ideas
* Interview → get asked questions in a content interview
* Source Mode → turn recordings, docs, or other files into content
Or scrolling down on your dashboard and:
* Picking one of the weekly content suggestions;
* Repurposing trending posts, or one of your own top-performing posts;
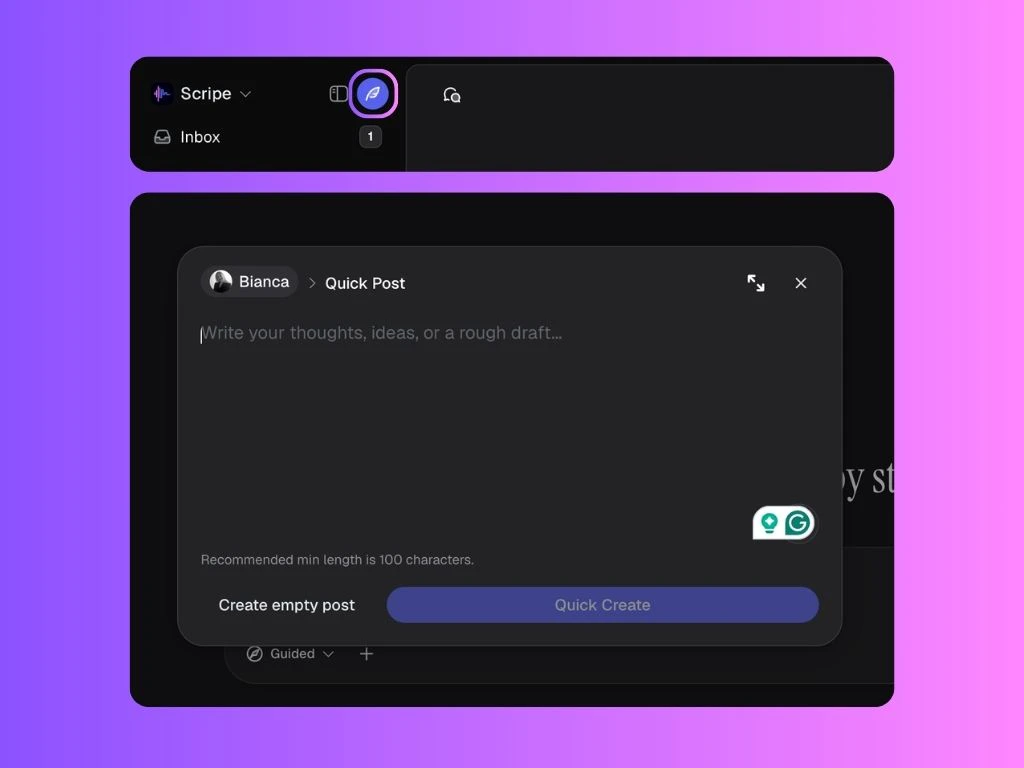
You can also click **Quick Create** in the top left corner to generate a post from text input or create an empty post.
You can also [connect your WhatsApp to Scripe](/integrations/whats-app) to easily turn your voice notes into ready-to-use posts.
## 5. Explore Scripe ;)
* Use the [Tone of Voice](/sidebar/tov) settings to teach Scripe how you write: what feels natural to you, and what doesn’t.
* Use the [Posts](/sidebar/posts) page to easily manage all your content and collaborate with your team.
* Use the [Calendar](/sidebar/calendar) view to organize your content and track consistency.
* Use the [Inspiration](/sidebar/inspiration) page to see what's trending.
* Check your [Analytics](/sidebar/analytics) tab to learn what works and improve from there.
## Extra Steps for Advanced & Business Plans
### Invite Members to your Workspace
If you're on the Advanced or Business Plan, you can add multiple members to your organization.
Assigning different Roles & Permissions is only available on the Business Plan.
**Here's how:**
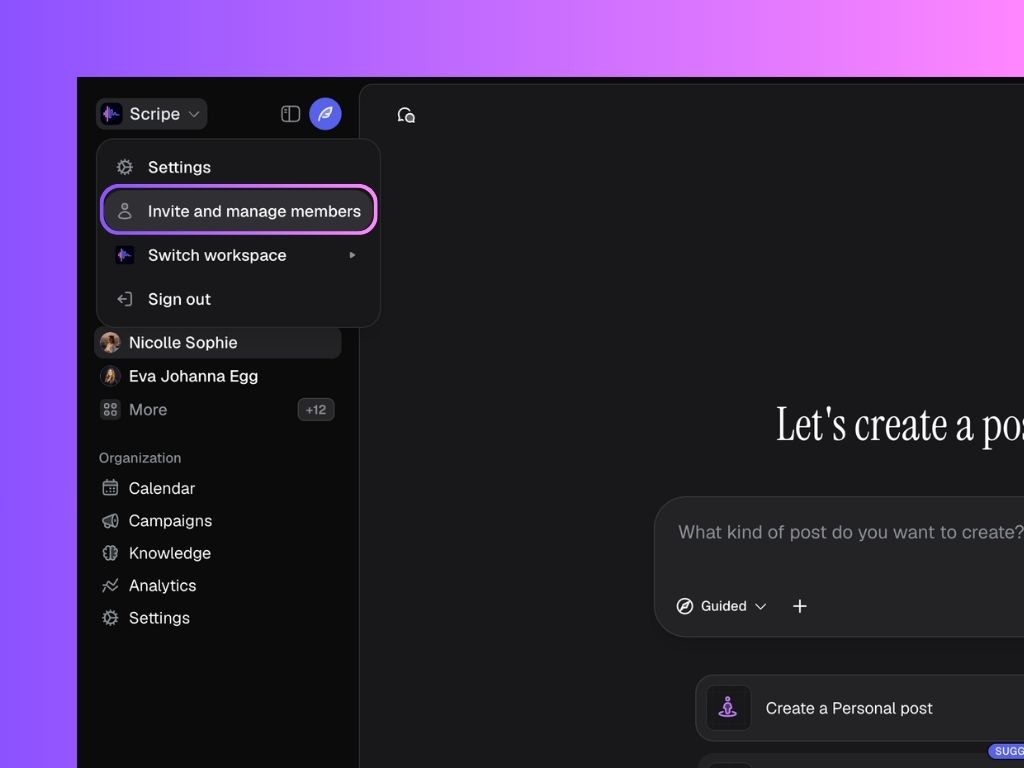
1. In Scripe, click the name of your workspace in the top-right corner.
2. Click **Invite and Manage Members**.
3. On the Users & Accounts page, click **Invite → Invite a teammate.**
4. Enter their email address, assign a Personal Brand (optional), and assign a role:
* **Admin** – Full access to everything.
* **Manager** – Manage members and accounts. No billing access.
* **Creator** – Can fully create and post on assigned accounts.
* **Assistant** – Supports with posts but can't publish.
* **Client** – Read-only review of assigned posts.
5. Send the invite.
You can control who can work on each LinkedIn account via the LinkedIn Accounts tab.
### Add more LinkedIn Accounts to your Workspace
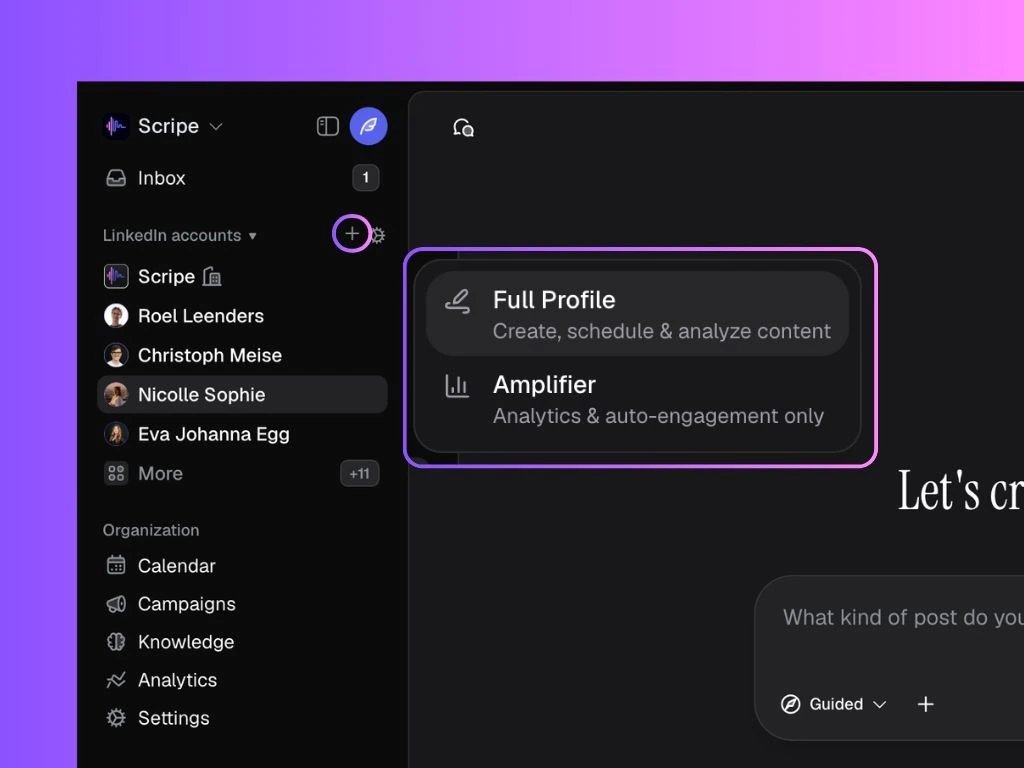
To add a new personal brand to your current workspace, click **Add Personal Brand**. Select between:
* **Full Profile:** to connect a LinkedIn account and use all content creation features.
* **Amplifier:** to connect an account just for analytics and auto-engagement features.
You’ll then go through the same onboarding steps (1–4) as you did during the initial setup.
**Important:** You'll need the login credentials to connect a new LinkedIn Account to Scripe. If you don't have them, the owner of the account will have to connect it themselves.
To delete a Personal Brand, go to your Settings → Click on the Personal Brand you want to delete → Delete Personal Brand.
### Create different Workspaces for different Clients
A Workspace is your shared environment in Scripe, where you can collaborate with others to manage multiple personal brands, coordinate content, and streamline LinkedIn activity across your organization.
When you subscribe to the Business Plan, each workspace serves as a centralized hub for each of your clients. This setup allows you to keep everything neatly separated per client — from personal brands and users to settings, calendars, and analytics.
Inside each workspace, you can:
* Set up and manage one or more personal brands for that specific client.
* Invite client-specific users with their own access.
* Keep content, scheduling, and analytics fully organized per client.
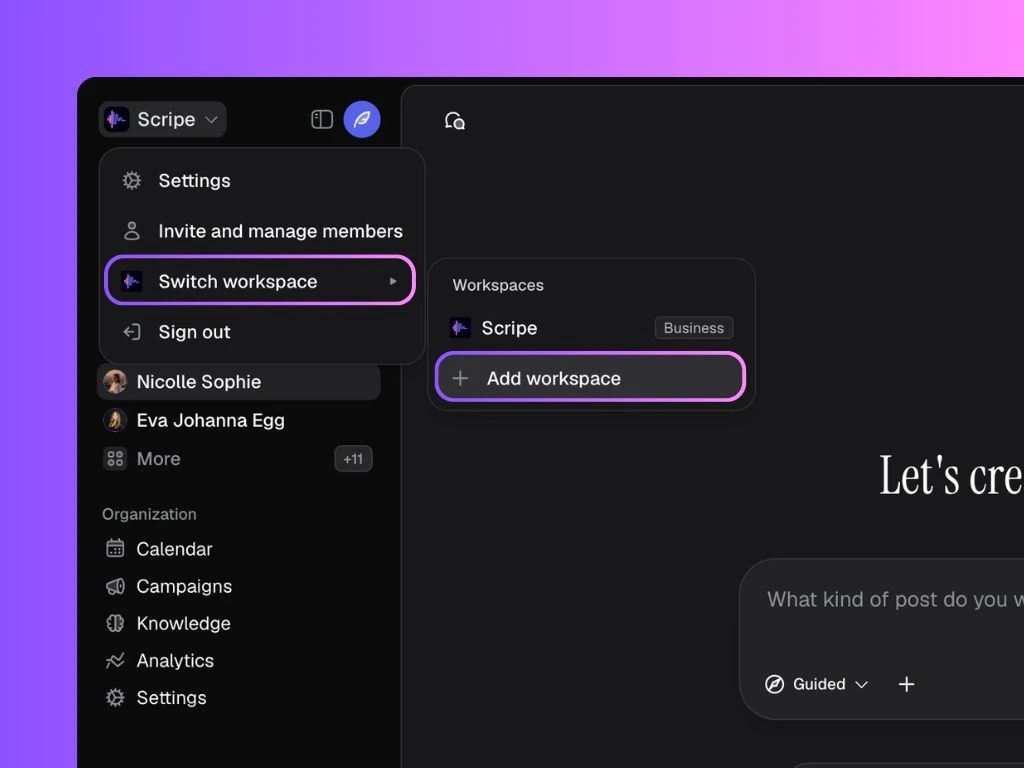
To manage or create new workspaces, open the menu by clicking on your workspace name in the top left corner and select **Switch workspace**. There, you’ll see a list of all your workspaces and the option to **Add Workspace**.
When creating a new workspace, you’ll:
1. **Name the workspace**.
2. **Add users immediately** (or skip and do this later).
3. **Add personal brands** by following steps 1–4 of this guide.
 To create a new workspace, simply enter your **company name** in the field provided and decide whether to enable **domain access**, which lets anyone with the same email domain join the workspace automatically without needing an invitation (their access will still require approval from the workspace admin).
Once ready, click **Create workspace** to set it up.
To create a new workspace, simply enter your **company name** in the field provided and decide whether to enable **domain access**, which lets anyone with the same email domain join the workspace automatically without needing an invitation (their access will still require approval from the workspace admin).
Once ready, click **Create workspace** to set it up.
 ## 3. Set up your Scripe Workspace
Once all of the above is done, you’ll land inside your **personal brand dashboard.**
## 3. Set up your Scripe Workspace
Once all of the above is done, you’ll land inside your **personal brand dashboard.**
 But before you start scriping, make sure you complete these final setup steps:
 Or scrolling down on your dashboard and:
* Picking one of the weekly content suggestions;
* Repurposing trending posts, or one of your own top-performing posts;
You can also click **Quick Create** in the top left corner to generate a post from text input or create an empty post.
Or scrolling down on your dashboard and:
* Picking one of the weekly content suggestions;
* Repurposing trending posts, or one of your own top-performing posts;
You can also click **Quick Create** in the top left corner to generate a post from text input or create an empty post.
 ### Add more LinkedIn Accounts to your Workspace
To add a new personal brand to your current workspace, click **Add Personal Brand**. Select between:
* **Full Profile:** to connect a LinkedIn account and use all content creation features.
* **Amplifier:** to connect an account just for analytics and auto-engagement features.
You’ll then go through the same onboarding steps (1–4) as you did during the initial setup.
### Add more LinkedIn Accounts to your Workspace
To add a new personal brand to your current workspace, click **Add Personal Brand**. Select between:
* **Full Profile:** to connect a LinkedIn account and use all content creation features.
* **Amplifier:** to connect an account just for analytics and auto-engagement features.
You’ll then go through the same onboarding steps (1–4) as you did during the initial setup.
 When creating a new workspace, you’ll:
1. **Name the workspace**.
2. **Add users immediately** (or skip and do this later).
3. **Add personal brands** by following steps 1–4 of this guide.
When creating a new workspace, you’ll:
1. **Name the workspace**.
2. **Add users immediately** (or skip and do this later).
3. **Add personal brands** by following steps 1–4 of this guide.